- Manda Mudd was designed with the Do-It-Yourselfer in mind!
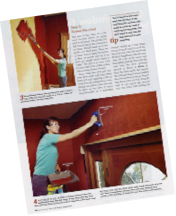
- It’s is as easy as 1-2-3. Step 1 is applied with a roller and/or brush. Steps 2 and 3 are applied with the trowel provided in the Manda Mudd Application Kit, or any trowel you may have on hand. The Application DVD available through our online store will show you what to do each step of the way.
- “Manda Mudd is so easy, my 13 year-old niece demonstrated it at our first Minneapolis Home & Garden Show presentation,” says Kristen Amanda.
- Still scared? Consider booking one of our In-Home, Hands-On Workshops, or come to our warehouse for a beginner Do-It-Yourself Workshop! You’ll be amazed how much fun you can have, and how quickly you’ll have your room transformed!
- The average bedroom can be completed in a day – start to finish!
- Even less if you get your friends to help!
- Depending upon humidity and air flow, each step should be dry within one hour. In most cases, by the time you have completed Step 1, you should be able to begin Step 2 where you began, followed by Step 3…
- Note: On days with high humidity, or in smaller rooms such as bathrooms; using a dehumidifier will be a time saver.
- Coverage for Step 1 and Step 3 is approximately 400 square feet. Step 2 covers approximately 200 square feet, (because this is your first textured layer.)
- For example: A “full set” of Manda Mudd, which consists of one can each of all three steps, will cover an 8‘x10’ room with 8 foot ceilings, a window and a door. To cover a 400 square foot space you will need only a second gallon of Step 2, as Steps 1 and 3 have twice the coverage of Step 2.
- Note: Please send us an email if you need help calculating square footage, or have questions about coverage.
– There is no need to be concerned about lap marks or keeping a wet edge as is the case with most other wall finishes. You can stop and start again at anytime. You can even go back over areas that have dried, and make changes or additions as you wish; days, weeks, even YEARS later!
– Note: This is only one of many reasons why Manda Mudd is such a great product for routine wear-and-tear touch-ups!!
– For a “full set” of Manda Mudd (one can of each step), an 8‘x10’ room can be completed for less than $200. And if you need the Application Kit, that’s just $32 more! Either way, the end-cost is less than 58 cents per square-foot! Compared to other wall finishes, that’s a bargain!
– Check out the MUDD SHOP for more exact prices or current sales…
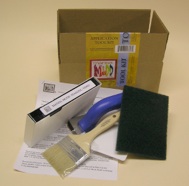
Other than drop cloths, a basic paint roller, a paint tray, and tape for masking, all you need to apply Manda Mudd is provided in the Application Kit, which includes an easy to follow instruction video. Visit our MUDD SHOP to purchase an Application Kit or other tools.
– Yes. Manda Mudd is actually perfect for these areas as it is durable, sealable and it’s texture is the perfect distraction from messy little hand prints. In the event a wall is scratched, marred, or dented, Manda Mudd is easily touched up.
– No need for messy spackling or repainting of an entire wall just to correct a small area. One quick swipe of the trowel over your damaged area with either Step 2 or 3 and you’re back in the game!
– Note: For Kitchens and baths we recommend that your completed walls be sealed with one of our suggested sealers to avoid food, oil or water staining. See the MUDD SHOP for our recommended options.
It is not necessary, but always an option. We offer several options for sealing your completed walls in finishes ranging from flat all the way to high gloss.
– How big is your bank account?!… We’re only kidding!
– We’d love to provide custom colors, but unfortunately, Manda Mudd does not tint in the same way paint does, with each color set requiring quite some time to formulate.; therefore, there is no custom tinting at this time.
– Manda Mudd color sets have been very carefully selected to provide you with the most timeless color offerings, regardless of your personal style. We are always working to formulate new colors in order to stay on trend and to meet the needs of all our customers!
– If you have an idea for a color that we don’t have, send us a standard paint color swatch and we’ll see what we can do to accommodate your request.
– NO! And this is VERY IMPORTANT! WE CAN’T STRESS THIS ENOUGH!!
– All three steps of Manda Mudd were designed with a proprietary composition to be compatible with each other step. Therefore, the use of Manda Mudd with other products is highly NOT recommended.
– Each step of Manda Mudd is carefully formulated to be compatible with the others, both in color and composition.
– Note: If you choose to use another product as your Step 1, you do so at your own risk , and we can no longer guarantee the results of your project! You have been warned…
– Yes!!! Manda Mudd loves ugly walls! With a little preparation, Manda Mudd can transform your walls “from blah, to voila!”
– 1) First, remove any loose wall paper.
– 2) Fill any gauges or holes with wall spackle.
– 3) Next, sand the remaining wall paper seams to prevent “seam” lines appearing after Manda Mudd application.
– 4) Seal the walls with a primer designed for bonding, sealing and stain blocking (we recommend, Kilz). This will ensure proper adhesion and prevent bleeding through of any wallpaper pattern or wallpaper paste residue.
– 5) At last! Proceed with Manda Mudd Steps 1, 2, & 3. You’re on your way to beautiful!
– Yes indeed, If you have sheet paneling there are two ways this can be done:
– 1) Line the paneled walls with a wall liner paper (as recommended by the manufacturer). Prime with a good quality primer, then proceed with all three steps of Manda Mudd.
– – OR –
– 1) Sand the paneling and wipe free of dust, then apply a bonder/sealer. This will help provide good adhesion. Fill in all the grooves with a “non-shrinking” patching compound/spackle. Then apply a coat of standard primer, proceeding with Steps 1, 2 and 3 of Manda Mudd after that.
– Note: Unfortunately, Manda Mudd CANNOT be used on tongue and groove wainscoting. Because this type of wainscoting is made of individual slats of wood, it expands and contracts with changing temperature and humidity. This instability will cause Manda Mudd, or any plaster, to crack.
– Well who isn’t?! There are several options for changing it up down the road. Here are just a few:
– You can simply paint over it with Manda Mudd Step 1 in your new color of choice, or with any other brand of paint; leaving you with slightly textured walls.
– You could sand over the textured walls and proceed with painting once they are smooth, but this is a messy option, and definitely requires lots of elbow grease; which leads us to our last option…
– Our favorite option: After painting a coat of Manda Mudd Step 1 in your new color of choice, apply a “skim-coat” of Manda Mudd Step 2 or 3 in the same color using the Venetian Plaster technique. (If you are unfamiliar of this technique of applying Manda Mudd, consider taking one of our Advanced Techniques Workshops to learn how!) The advantage to this option is that while you are skim-coating the walls back to smooth, you are simultaneously applying your color! It’s effective and it’s fun!
With Manda Mudd, the color is all the way through the texture, so minor scrapes and dents only add charm and character to your walls. Should touch-ups be needed, however; just one stroke of the trowel with a little bit of Step 2 or 3, and everything is as good as new… no need to repair entire walls or even entire rooms as you must do when touching up paint!
Subscribe to our newsletter to receive news,
updates, and other stuff by email: